|
Step 1:
Creating a new HTML project
The first step for every web project is to create a folder
under which you will later save all files (e.g. html documents,
pictures etc.) required for your web page. The folder will also
contain the homepage document. Basically, you could name the file
however you want but is has become a standard to name it index.html
Exercise:
- Open the Windows Explorer and create a folder
called 'My Resume'
- Click on Start > All Programs > Accessoires > Notepad
(select Editor if you work with a German Office version)
to open the Windows text editor.

- Copy & paste the following html-tags (written
in red) into the text editor window
<html>
<head>
<title>page title</title>
</head>
<body>
page content
</body>
</html>
- Save this file as index.html to your folder 'My resume'.
Before you save the file read item 5!
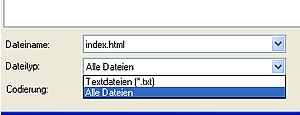
- Be careful when saving the file! You have to type 'index.html'
in the file name field and under 'Save as type' make sure you
select 'All Files' in the pull down menu. Otherwise your file
will be saved as a simple text file and not as html-document.
Do not worry about the Encoding.
- Open the Internet Explorer and in the 'File'
menu click on Open ... Search for and open the index.html file
you have just saved. Your browser window should look similar to
this example.
- The page title 'page title' is displayed in the top blue
bar of your browser window and in the content area you can see
the text 'page content'. You will change these entries
later.
- In the 'View' menu click on 'Source' and you can see
now the html tags you have just entered.
- A blank web page is now displayed in your web browser.
- Congratulations! You have successfully completed Step
1 and can now move on to Step 2!
- In Step 2 you will add text to your web page.
|